Table of Contents
可控视频生成 陆宇昕 Link to 可控视频生成 陆宇昕
一、Unet Link to 一、Unet
1. Latent Video Diffusion Models for High-Fidelity Long Video Generation Link to 1. Latent Video Diffusion Models for High-Fidelity Long Video Generation
[2211.13221] Latent Video Diffusion Models for High-Fidelity Long Video Generation
YingqingHe/LVDM: LVDM: Latent Video Diffusion Models for High-Fidelity Long Video Generation
Autoencoder Link to Autoencoder
使用3D自编码器,Encoder和Decoder都是由若干3D卷积组成
使用损失函数为

是重建损失,和重建后的做和损失
是对抗损失,是对抗训练的判别器,消除通常由像素级重构损失引起的重构模糊
短视频生成 Link to 短视频生成
和正常SD类似,区别在于使用3D-Unet,具体来说,使用形状为 1 × 3 × 3 的纯空间 3D 卷积,并在部分层中添加时间注意力。
joint spatial-temporal self-attention 和 factorized spatial-temporal attention 选择使用后者,因为前者增加模型复杂度,并且有时会在随机位置引入斑点状伪影。
使用Adaptive Group Norm注入Timestep Embedding到Normalization模块,来控制channel-wise scale和bias parameters,这种方法能提高采样保真度。
长视频生成 Link to 长视频生成
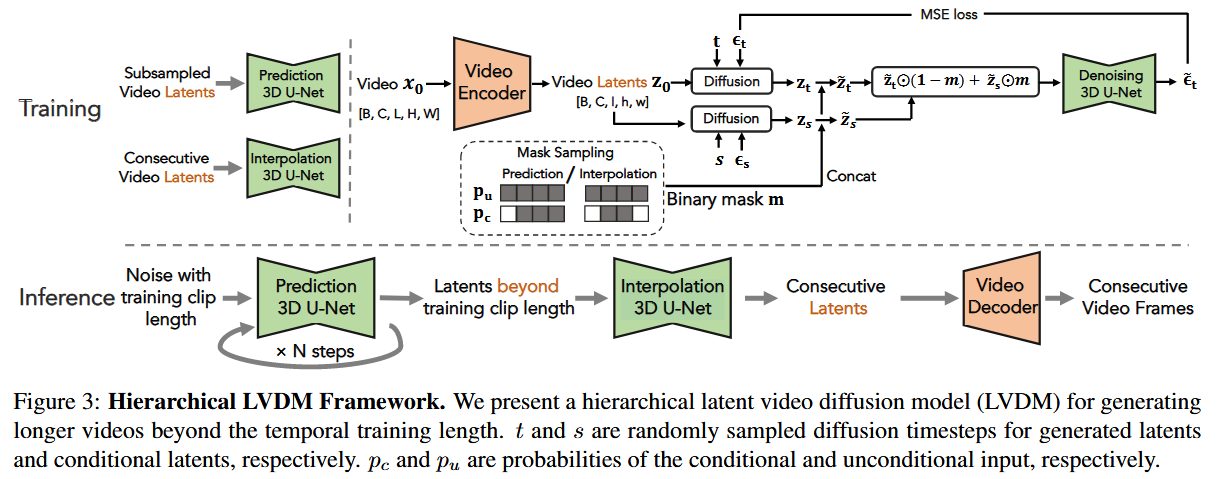
1.自回归潜在预测(Autoregressive Latent Prediction) Link to 1.自回归潜在预测(Autoregressive Latent Prediction)
设短视频片段的潜在编码为,其中表示潜在帧数。 为了预测未来潜在帧,我们在输入中加入二进制掩码,指示哪些帧需要预测:
当掩码全为0时,即无条件(不依赖前面的生成的帧数)生成;当部分掩码为1时,即条件生成。
通过这种机制,模型能够统一实现无条件与条件视频生成。
2.层次化潜在生成(Hierarchical Latent Generation) Link to 2.层次化潜在生成(Hierarchical Latent Generation)
长视频自回归生成时,随着预测步数增加,误差会逐渐积累并导致质量下降。为缓解这一问题,我们采用层次化生成策略:
先生成稀疏关键帧,捕捉视频的基本骨架与故事线;
再利用插值模型补全中间帧,生成完整视频。
这种方式减少了自回归步骤,显著降低了误差累积的风险。
3 条件潜变量扰动(Conditional Latent Perturbation) Link to 3 条件潜变量扰动(Conditional Latent Perturbation)
即便采用层次化生成,长视频仍然需要较多预测步骤,因此不可避免地产生条件偏移问题。为此,我们提出条件潜变量扰动:
- 与其直接使用预测得到的条件帧 ,我们在其上加入轻微噪声扰动 ,得到
- 再通过扩散去噪过程恢复,以保证条件信息的鲁棒性
这样做能够有效减轻预测误差在长视频生成中的累积效应。
4 无条件引导(Unconditional Guidance) Link to 4 无条件引导(Unconditional Guidance)
为了进一步缓解自回归过程中的质量退化问题,利用无条件分数 来引导条件生成。其核心思想是:
- 误差主要影响条件分布,但无条件分布不受影响;
- 将无条件分数引入预测过程,可提升多样性与保真度。
具体公式为:
其中, 为条件分数, 为无条件分数,为引导强度。
该方法本质上是 classifier-free guidance 的扩展,首次应用于长视频生成任务。
2. Tune-A-Video: One-Shot Tuning of Image Diffusion Models for Text-to-Video Generation Link to 2. Tune-A-Video: One-Shot Tuning of Image Diffusion Models for Text-to-Video Generation
2212.11565] Tune-A-Video: One-Shot Tuning of Image Diffusion Models for Text-to-Video Generation
不使用大规模数据集来训练Text-to-Video模型,而是基于Sota的预训练好的T2I模型,仅使用一个text-vidio对,进行调优。
motivation为:
- T2I模型可以生成代表动词术语的静止图像
- 将 T2I 模型扩展为并发生成多张图像,具有良好内容一致性
Tune-A-Video的做法是想通过学习一个网络权重,来学习一个视频帧与帧之间的一致性。进而在模型推理的时候,结合DDIM inversion拿到的init latents,通过改变text prompt来实现editing的效果,总体上可以理解为通过一个per-video model weights来实现了motion transfer
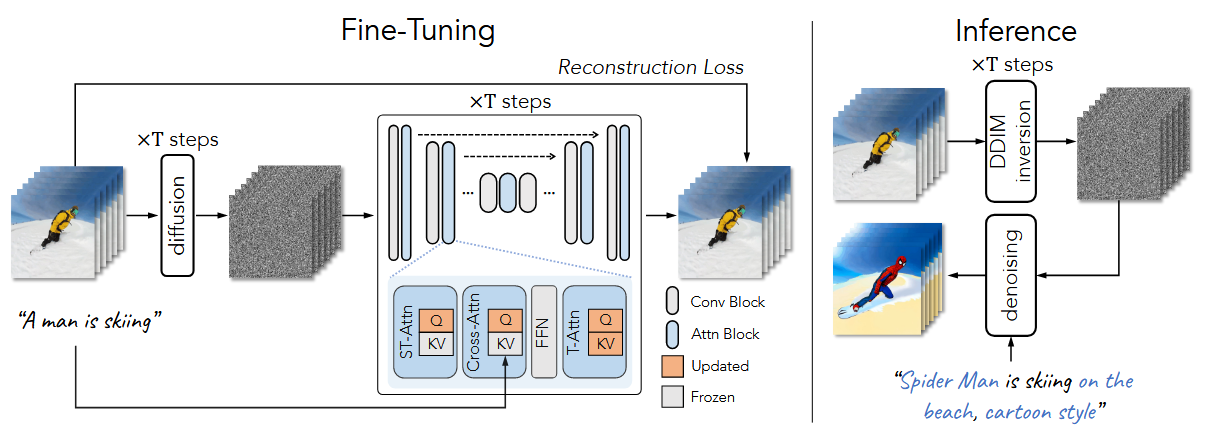
从上图我们可以看到Tune-A-Video的做法同样是往U-net中加入adapter的方式,让adapter从视频数据的训练中学习到帧间一致性。具体来说,Tune-A-Video提出来一个叫做ST-Attn的注意力模块,从名字不难看出,这里的「ST」指的应该就是「Spatial-Temporal」。
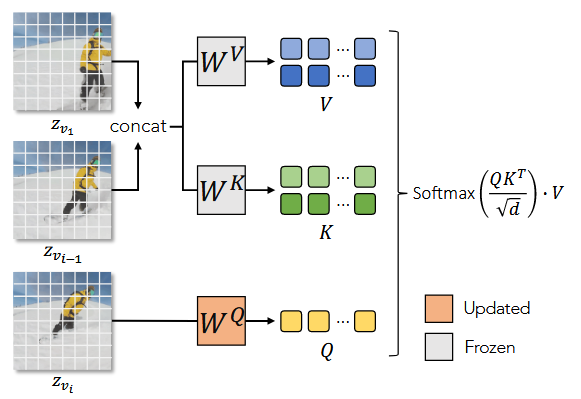
具体的做法我们可以看到这里一共有三种下标:1 、 、 ,他们指代的分别就是视频的第1、、帧,在ST-Attn中,attention的key和value都是第1帧和第帧的串联形式,也就是说,这里学习的是模型起始帧、第帧,以及第帧之间的一致性。理论上模型一旦能训练好,视频的帧间一致性(其实更类似于一个视频的motion pattern信息)也就由更新的模型权重学习得到了
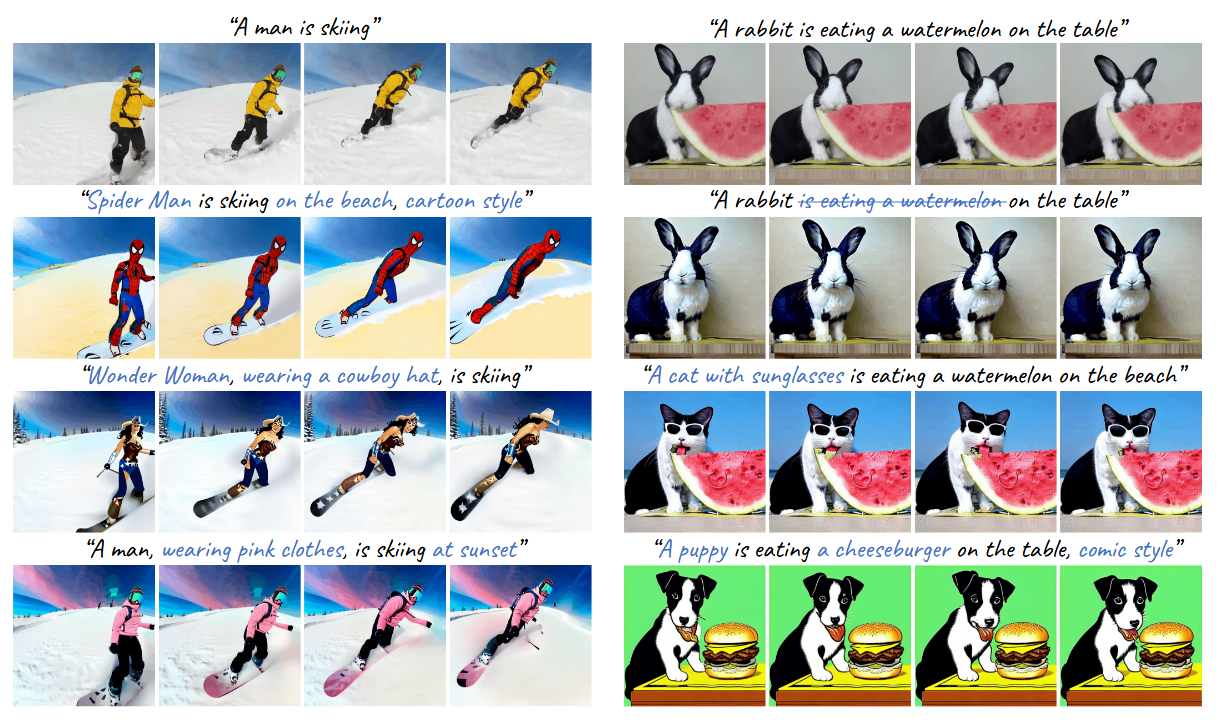
以从Tune-A-Video的结果看到,edit之后的物体与原视频之间仅仅是语义上的差别,而这个差别则是由text prompt控制的。即使如此,one-shot形式的video fine-tuning需要不少的时间,实际每个视频需要大约15分钟左右的时间,所以在efficiency上还有待商榷。但尽管如此,也不影响Tune-A-Video仍然是一个非常棒的工作。
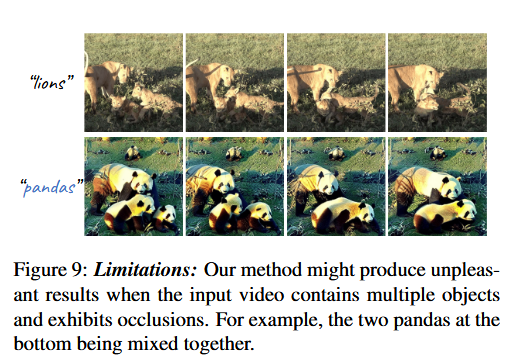
不足:多物体、遮挡情况,存在局限性
3. AnimateDiff: Animate Your Personalized Text-to-Image Diffusion Models without Specific Tuning Link to 3. AnimateDiff: Animate Your Personalized Text-to-Image Diffusion Models without Specific Tuning
guoyww/AnimateDiff: Official implementation of AnimateDiff.
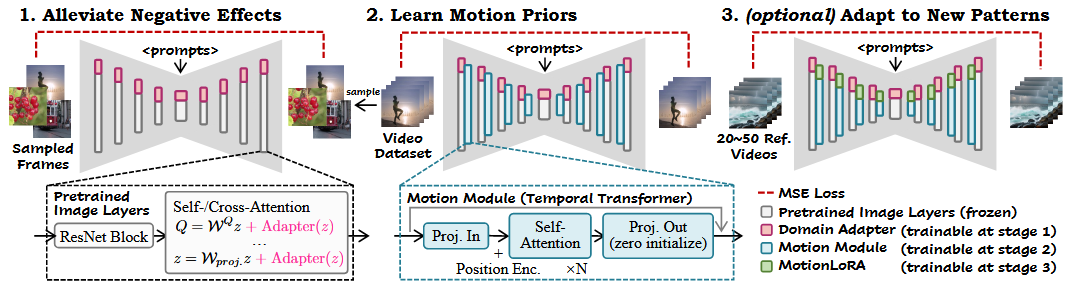
LoRA做领域适配 Link to LoRA做领域适配
运动模块实现运动先验 Link to 运动模块实现运动先验
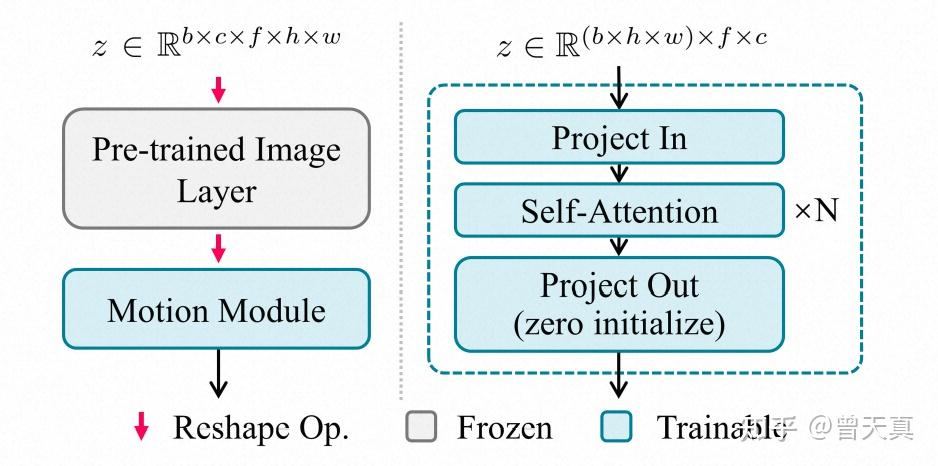
为了利用T2I模型先验,合理的方式是将这些图像层扩展为可以独立处理视频帧。
输入为 5D 视频张量
经过Image Layer时,frame维度会被折叠进批量维度batch,从而使模型可以独立处理每一帧。
之后,将特征图重新 reshape 回 5D 张量。
输入的特征映射会沿着时间轴 reshape 成序列,然后输入到多个自注意力块中。
在时序运动模块中,沿着时域上有数个Attention模块组成,同时在空域上的height , width 两维特征会首先被reshape到batch维度,最终从而产生frame长度batch的序列 **。**以上特征被送入数个Self-Attention模块:
注意力机制能够使当前帧的信息融合其他帧的特征,从而学习内容随时间变化的规律,这些规律即构成动画中的运动动态。
为了避免模块引入有害影响,我们对输出投影层进行零初始化,并加入残差连接,使得运动模块在训练初始阶段相当于恒等映射。
使用MotionLoRA适配新的运动模式 Link to 使用MotionLoRA适配新的运动模式
虽然预训练的运动模块捕获了通用的运动先验,但在实际应用中,我们需要将其适配到新的运动模式,例如相机缩放、平移、旋转等。这种适配需要在少量参考视频和有限训练迭代下完成,以便用户在不承担昂贵训练成本的情况下,微调运动模块以实现特定效果。
这就是 AnimateDiff 的最后阶段 MotionLoRA。我们在运动模块的自注意力层上插入 LoRA 层(如第 4.2 节所述),并在新的运动模式的参考视频上训练这些 LoRA 层。
运动模块和MotionLoRA的训练目标 Link to 运动模块和MotionLoRA的训练目标

4. Stable Video Diffusion: Scaling Latent Video Diffusion Models to Large Datasets Link to 4. Stable Video Diffusion: Scaling Latent Video Diffusion Models to Large Datasets
Stability-AI/generative-models: Generative Models by Stability AI
时序层 Link to 时序层
3D卷积 Link to 3D卷积
2D卷积是对B C H W的(H W)做卷积
3D卷积则是把(B T) C H W变成B C T H W,卷积完再还原
时序注意力 Link to 时序注意力
图像注意力中:B C H W 的数据会被转换成 B (H W) C 输入进注意力层
视频注意力中:(B T) C H W 变为 (B T) (H W) C。表示同一组、同一帧的图像的每个像素之间,两两交换信息。
微调 VAE 解码器 Link to 微调 VAE 解码器
修改了图像压缩模型 VAE 的解码器。具体来说,方法先在 VAE 的解码器中加入类似的时序层,并在 VAE 配套的 GAN 的判别器里也加入了时序层,随后开始微调。在微调时,编码器不变,仅训练解码器和判别器。
二、DiT Link to 二、DiT
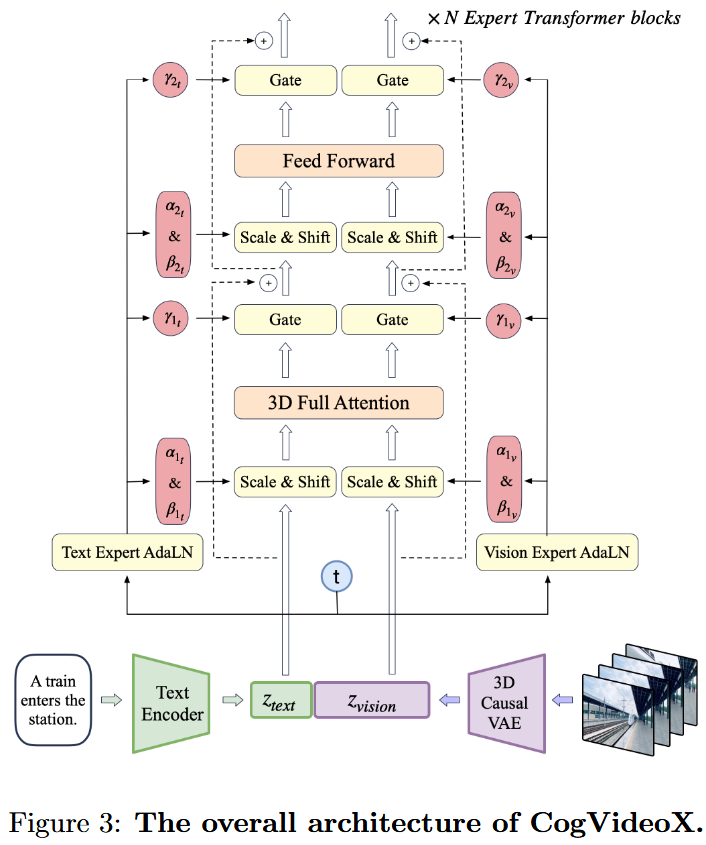
1. CogVideoX: Text-to-Video Diffusion Models with An Expert Transformer Link to 1. CogVideoX: Text-to-Video Diffusion Models with An Expert Transformer
[2408.06072] CogVideoX: Text-to-Video Diffusion Models with An Expert Transformer
CogVideo/README_zh.md at main · zai-org/CogVideo
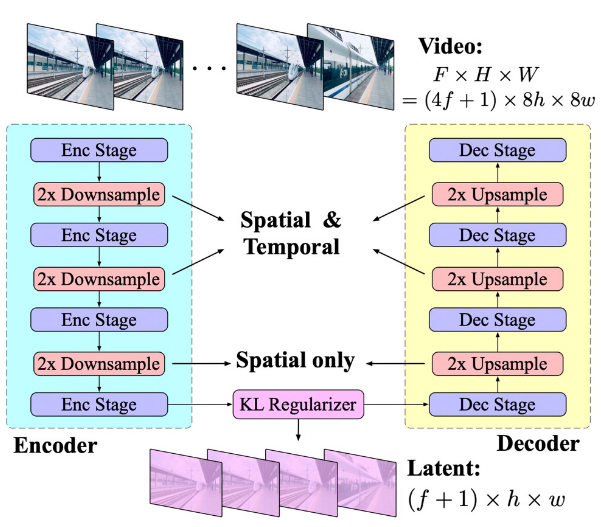
3D Casual VAE Link to 3D Casual VAE
==+1的静态帧,Open-SORA==
包含一个编码器、一个解码器以及一个 Kullback-Leibler (KL) 正则化器。编码器和解码器由对称排列的多个阶段构成,分别执行 2× 下采样和2× 上采样(所以下采样倍数是),时间4,空间8。其中通过 ResNet 模块堆叠交替实现。有些模块执行 3D 下采样 (上采样)(也就是标的Spatial & Temporal),而另一些仅执行 2D 下采样 (上采样)(也就是标的Spatial only)。
使用时间因果卷积,如下图所示
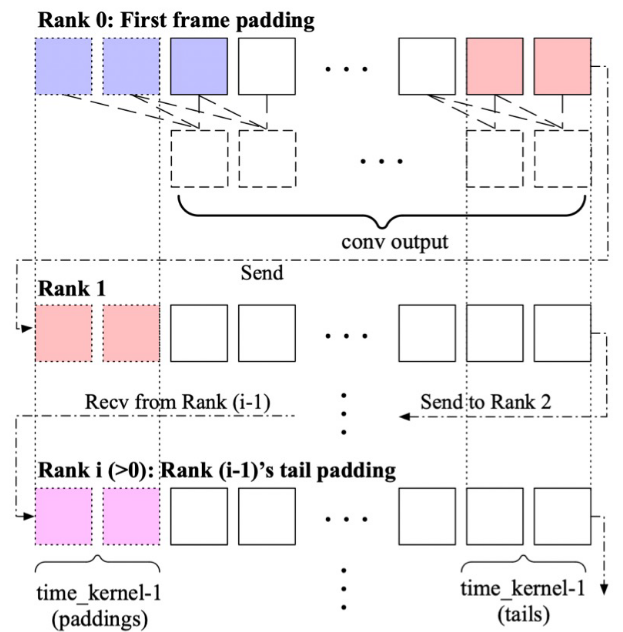
为了防止未来的时序信息泄漏到当前或更早的时间中,这里采取了一种特殊的 padding 方式,也就是只在前方进行 padding,这样卷积时就不会把后续 token 的信息泄露到当前 token。
Expert Transformer Link to Expert Transformer
1.Patchify Link to 1.Patchify
CogVideoX 的分块策略和 DiT 的相同,同时为了使模型能够同时在视频和图像数据上进行训练(这部分会在训练策略部分介绍),并不在时间维度上进行分块。也就是说对于一个大小为的输入,会分成长度为的序列。
2.3D RoPE Link to 2.3D RoPE
==RoPR和DiT手撕,传统RoPE和3D的改进==
视频经过 patchify 后,每个位置可以用一个三维坐标(x,y,t)来表示,CogVideoX 的做法是对每一个坐标分别进行旋转位置编码,再沿通道直接拼接到一起。其中,表示空间位置的坐标分别占,表示时间的坐标占。
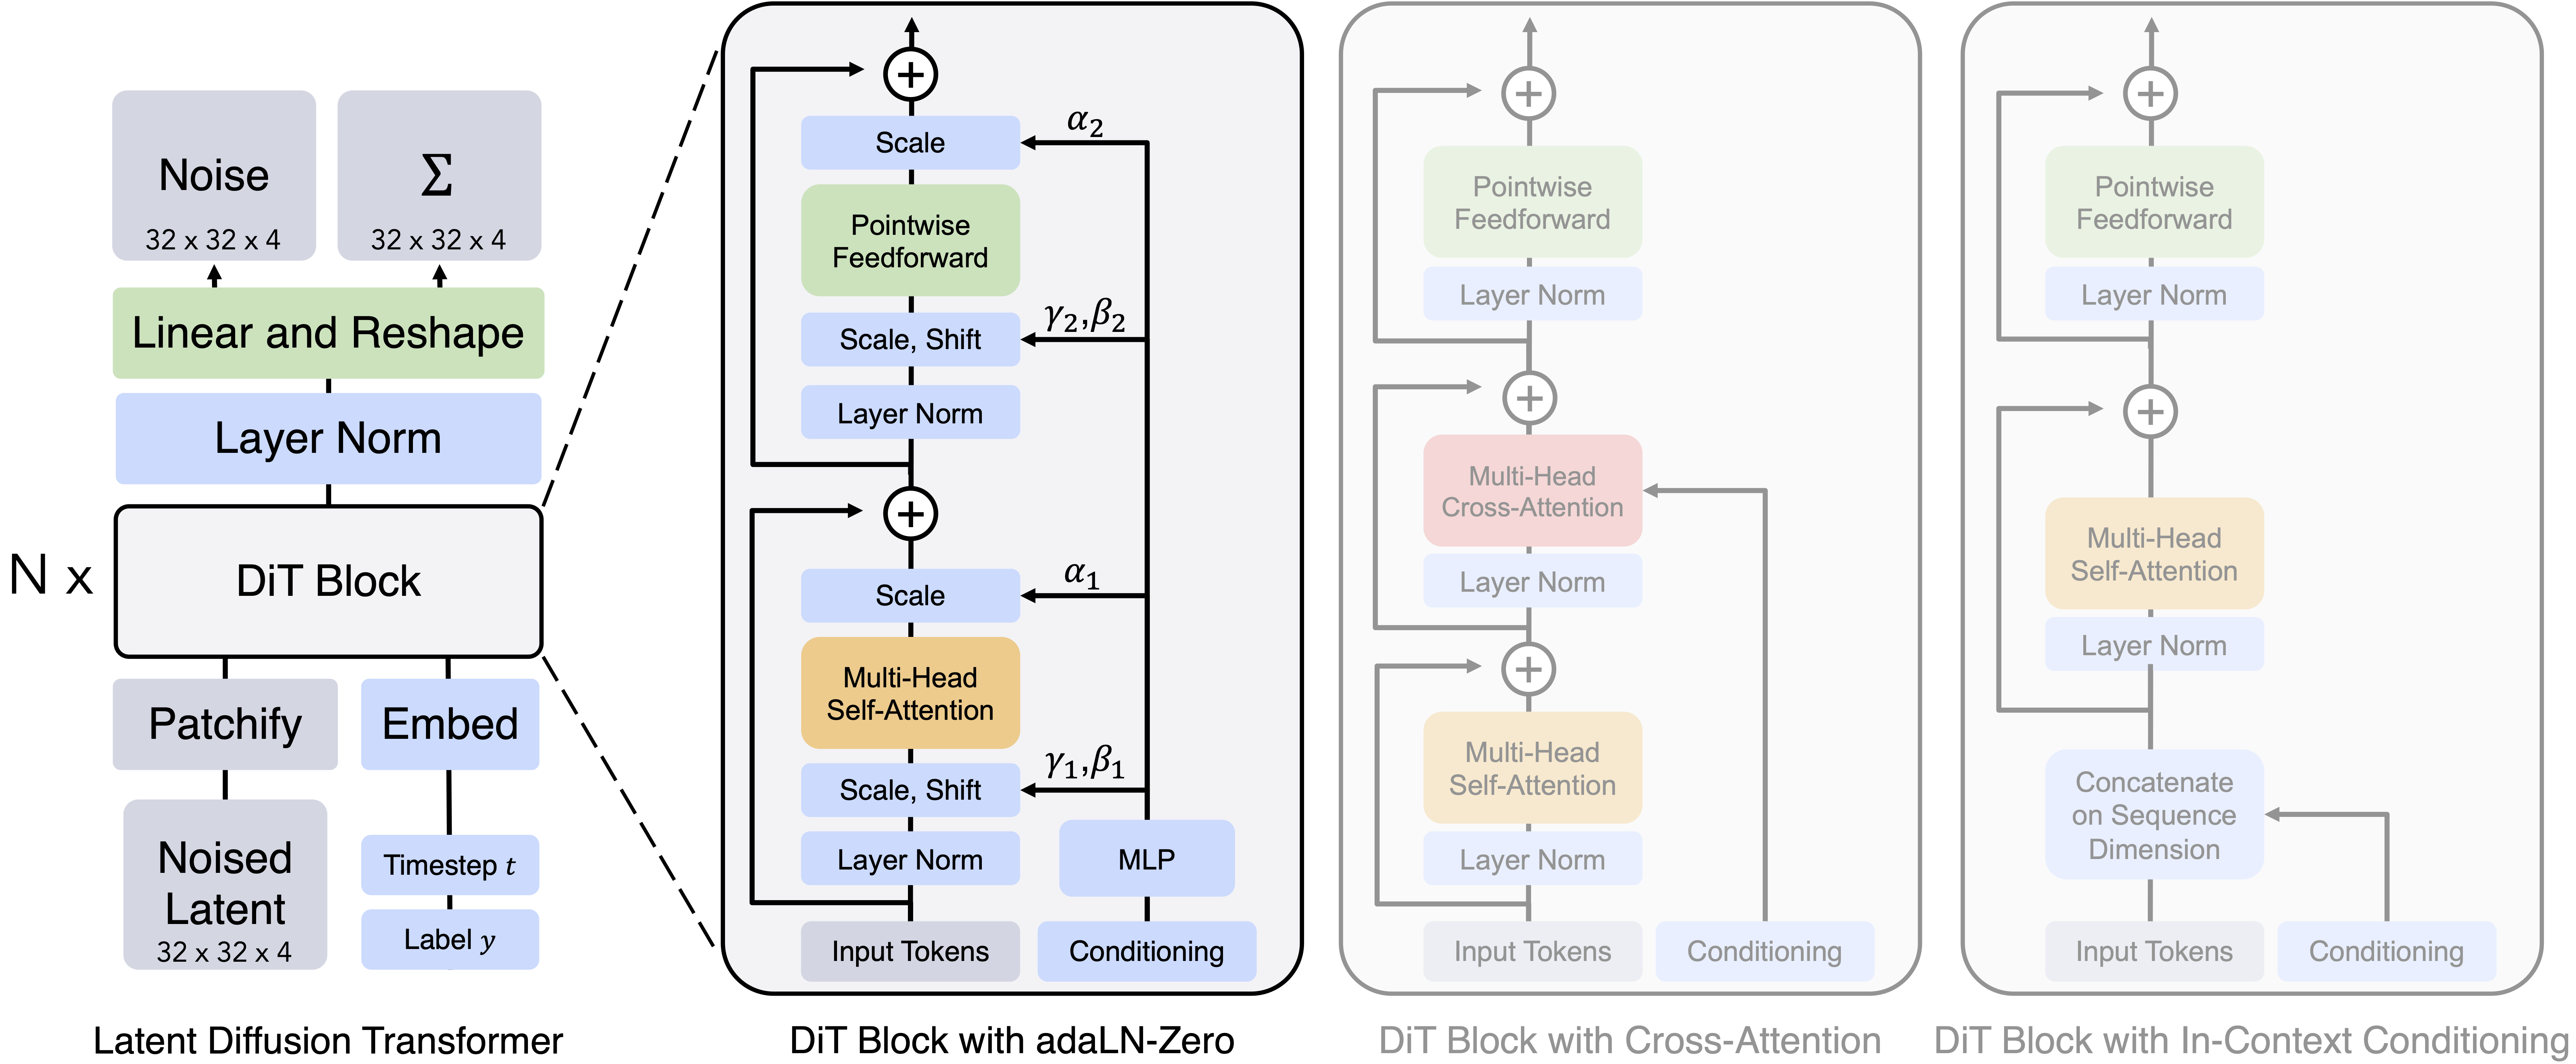
3.Expert Transformer Block Link to 3.Expert Transformer Block
输入:text和video的embedding拼接在一起,以便更好地对齐视觉与语义信息。然而,这两种模态的特征空间差异很大,数值尺度也可能不同。为了解决这一问题,我们采用Expert AdaLN来分别处理不同模态。
类似参考 DiT,我们使用扩散过程中的时间步 t 作为调制模块的输入。就是两个模态分别做 projection 和 AdaLN,然后再用注意力做特征交互,最后和 DiT 一样用一个 scale 参数进行 gating。
4.3D Full Attention Link to 4.3D Full Attention
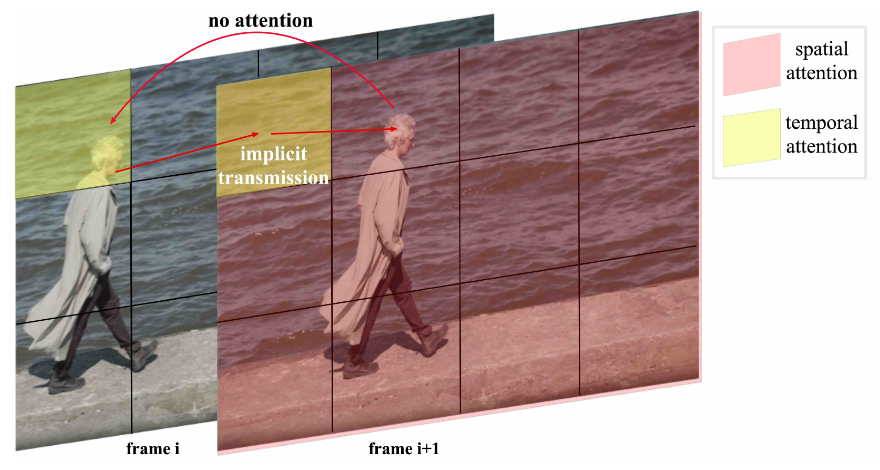
分离的spatial和temporal注意力机制使得处理相邻帧之间的大幅度运动变得困难。如图所示,第 i + 1 帧中人的头部无法直接关注到第 i 帧中的头部。相反,视觉信息只能通过其他背景区域隐式地传递。这可能会导致生成的视频中出现不一致问题。
应该是对整体的所有 token 计算 attention,而不是时间和空间分开。
训练 Link to 训练
Multi-Resolution Frame Pack Link to Multi-Resolution Frame Pack
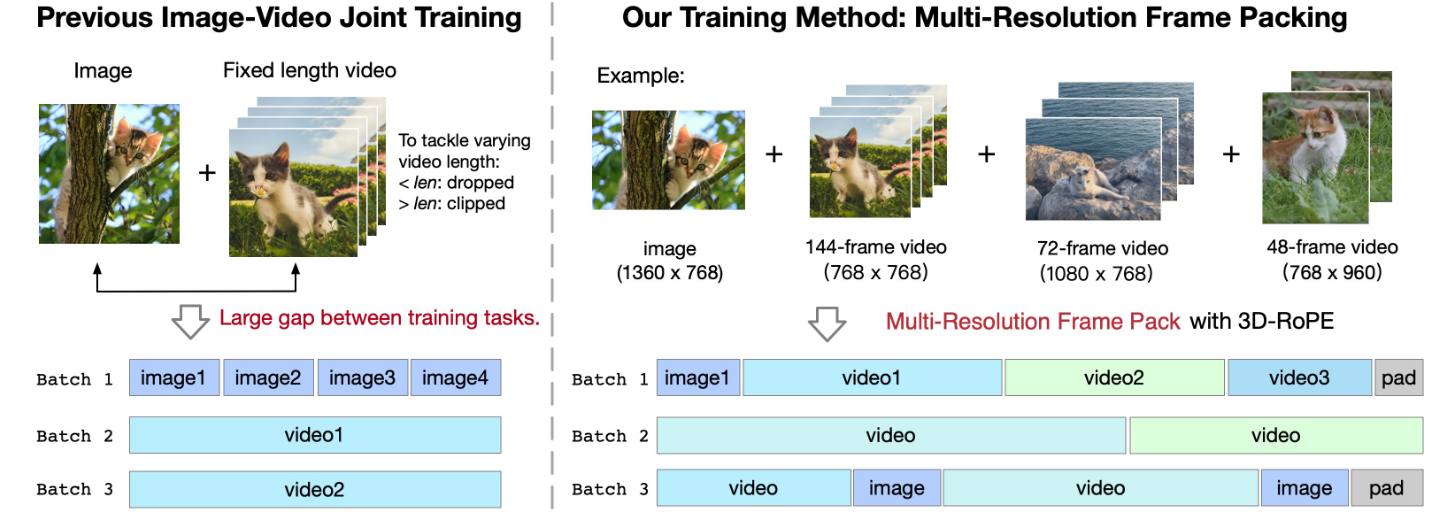
CogVideoX 并没有采用和其他方法相同的定长视频训练,而是采用了一种打包训练的方法,通过把不同长度的视频都打包在一个 batch 中,来确保不同 batch 维度相同。
在建模时,使用 3D-RoPE 表示不同分辨率和时长的视频位置关系。
Progressive training Link to Progressive training
逐步低分到高分训练
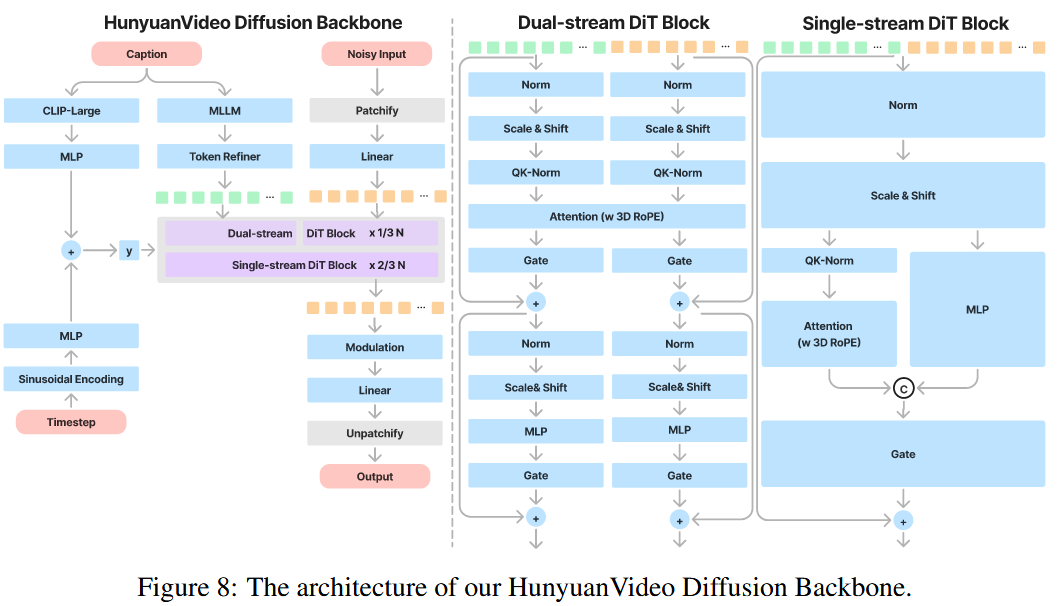
2. HunyuanVideo: A Systematic Framework For Large Video Generative Models Link to 2. HunyuanVideo: A Systematic Framework For Large Video Generative Models
[2412.03603] HunyuanVideo: A Systematic Framework For Large Video Generative Models
Tencent-Hunyuan/HunyuanVideo: HunyuanVideo: A Systematic Framework For Large Video Generation Model
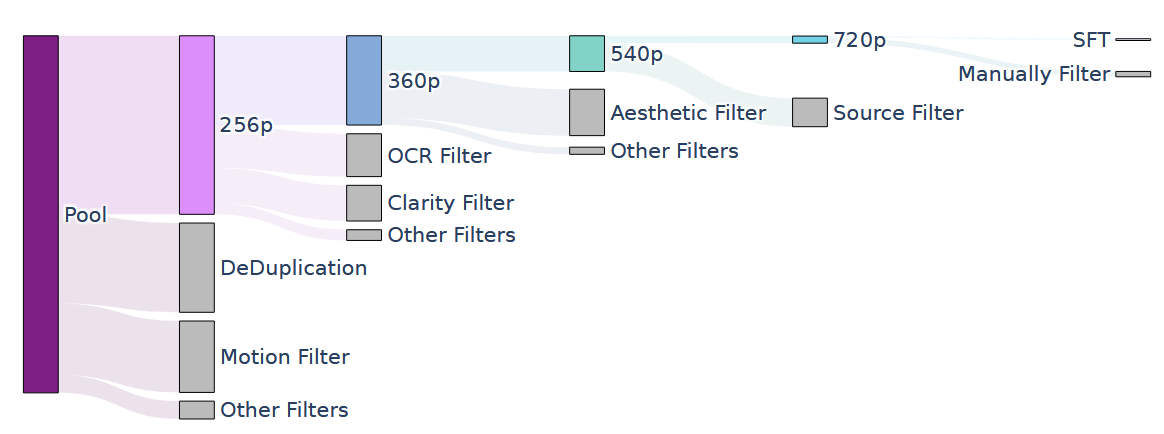
数据 Link to 数据
一个很复杂也很重要的部分,太多不记录了,看原文,过滤得到的五个训练阶段的数据如下
3D VAE Link to 3D VAE
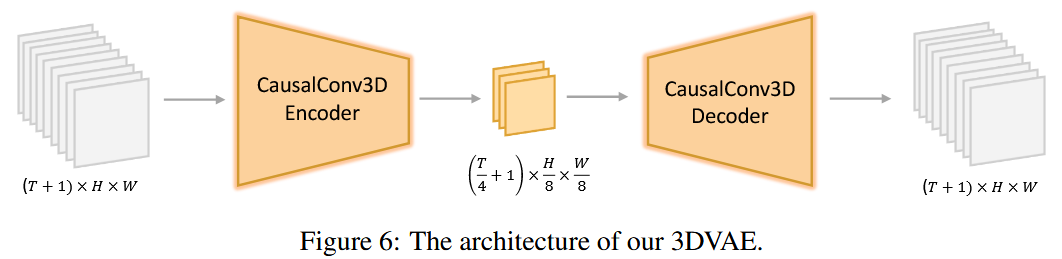
为了同时处理视频和图像,我们采用 CausalConv3D(和CogVideoX引用的同一篇论文,是一个东西)
这里是压缩为
训练 Link to 训练
不依赖预训练的图像VAE进行参数初始化,而是从头开始
为了平衡视频和图像的重建质量,以4:1的比例混合视频和图像数据
损失为

从低分辨率的短视频逐渐训练到高分辨率的长视频
推理 Link to 推理
1.在单个GPU上编码和解码高分辨率长视频可能导致内存不足错误。
为了解决这个问题,我们使用空间-时间平铺(Tiling)策略,将输入视频沿空间和时间维度分割成重叠的平铺。
每个平铺分别编码/解码,然后输出结果拼接在一起。对于重叠区域,我们使用线性组合进行混合。
这种平铺策略使我们能够在单个GPU上编码/解码任意分辨率和时长的视频。
2.在推理过程中直接使用平铺策略可能会由于训练和推理之间的不一致而导致可见的伪影。
引入了一个额外的微调阶段,在训练过程中随机启用/禁用平铺策略。
确保了模型与平铺和非平铺策略兼容,保持了训练和推理之间的一致性。
Transformer Link to Transformer
采用统一的全局注意力:
- 首先,它比分割的时空注意力表现出更优越的性能。
- 其次,它支持图像和视频的统一生成,简化了训练过程并提高了模型的可扩展性。
- 最后,它更有效地利用了现有的LLM相关的加速能力,提高了训练和推理效率。
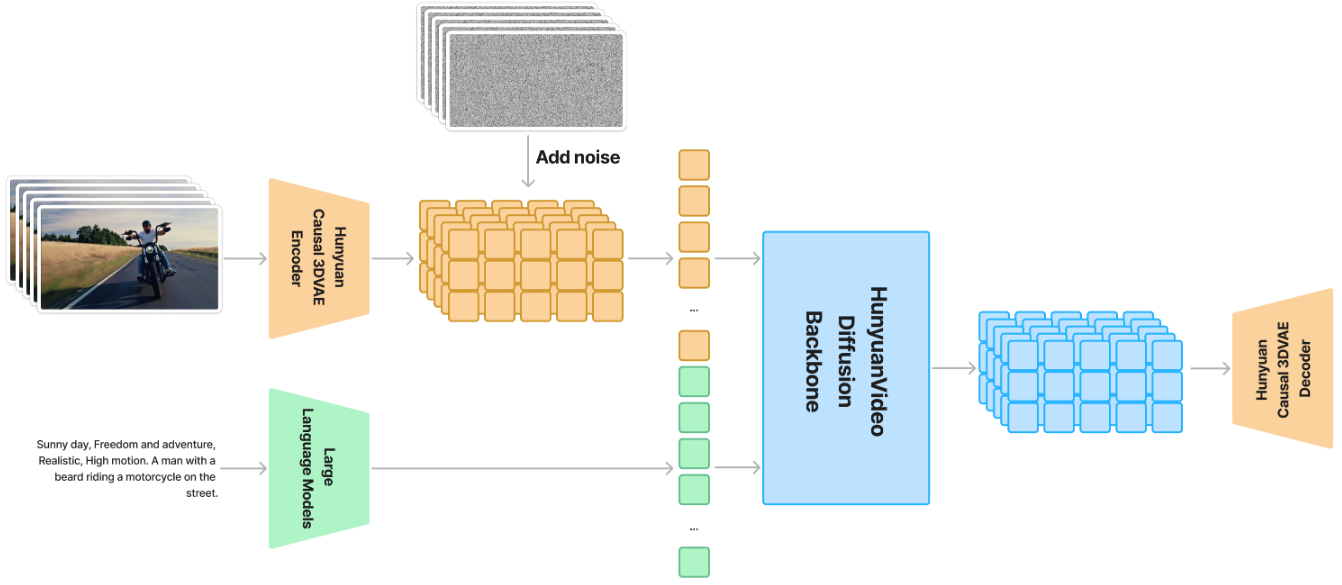
Input Link to Input
对于一个给定的文本-视频对:
- 视频分支:图像视为单帧视频,经过3DVAE的3D卷积分块后,并展开为一维token
- 文本分支:使用一个先进的 LLM 将文本编码为语义嵌入,捕捉细粒度的语义信息。同时,我们利用 CLIP 模型提取池化后的文本表示,以获取全局信息。该表示随后被扩展并加入时间步嵌入,再送入模型。
Model Design Link to Model Design
为了有效地整合文本和视觉信息,遵循了“双流到单流”混合模型设计的策略,模仿FLUX
双流:视频与文本 token 独立输入多个 Transformer 块,使各模态能够自主学习最优的调制机制,互不干扰;
单流:将视频与文本 token 拼接,并输入后续 Transformer 块,实现跨模态的信息融合。
Position Embedding Link to Position Embedding
为了支持多分辨率、多宽高比和不同持续时间的生成,在每个Transformer块中使用RoPE。
RoPE 将旋转频率矩阵应用于嵌入向量,增强模型捕捉绝对与相对位置信息的能力,并展现出一定的外推能力。由于视频数据中包含时间维度的复杂性,我们将 RoPE 扩展到三维:
- 分别计算时间T、高度H、宽度 W 三个坐标的旋转频率矩阵;
- 将 query 和 key 的通道分为三部分;
- 每一部分分别与对应的坐标频率相乘,再拼接。
这样得到的嵌入具有 位置感知的 query 与 key 表示,用于注意力计算。
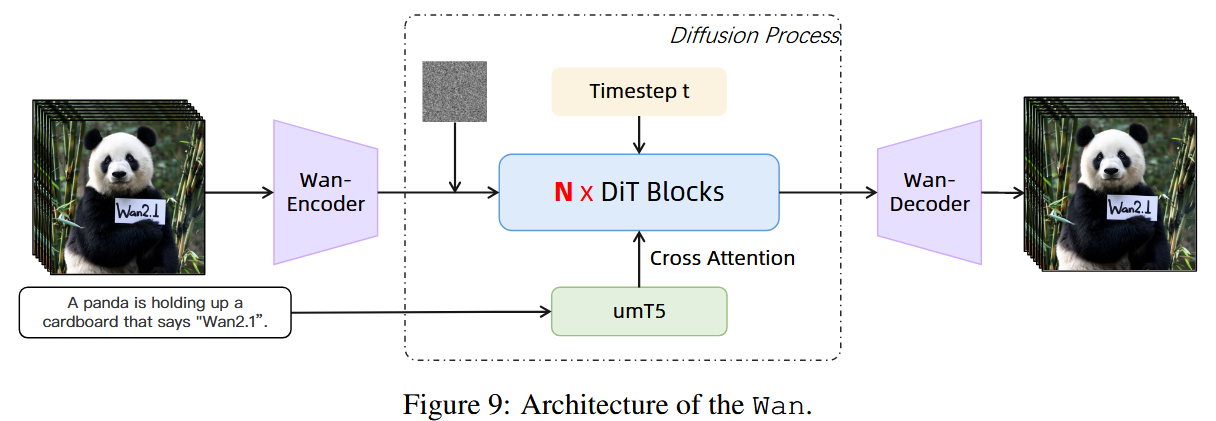
3. Wan: Open and Advanced Large-Scale Video Generative Models Link to 3. Wan: Open and Advanced Large-Scale Video Generative Models
[2503.20314] Wan: Open and Advanced Large-Scale Video Generative Models
Wan-Video/Wan2.1: Wan: Open and Advanced Large-Scale Video Generative Models
VAE Link to VAE
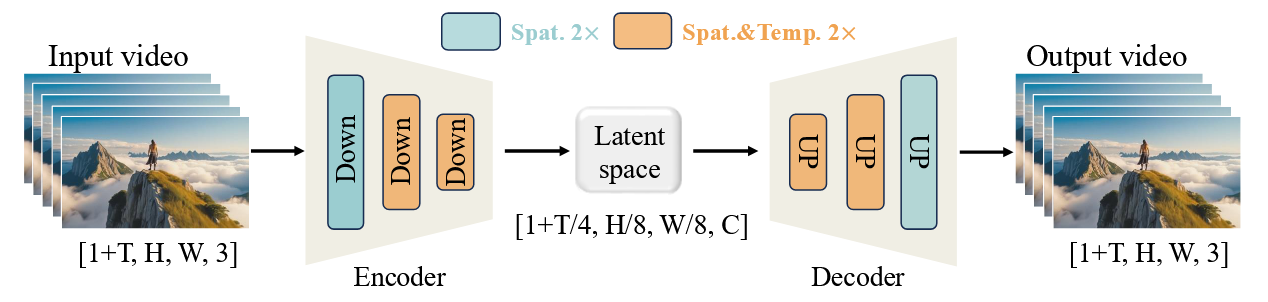
给定一个输入视频 ,Wan-VAE 将其时空维度压缩为,同时将通道数扩展为 16
首帧只进行空间压缩。
==1是静态latent,后续是动态latent==
在架构上,将所有 GroupNorm 层 替换为 RMSNorm 层,以保持时间因果性。
没懂怎么就保持==时间因果性==了
cache机制 Link to cache机制
支持无限长视频
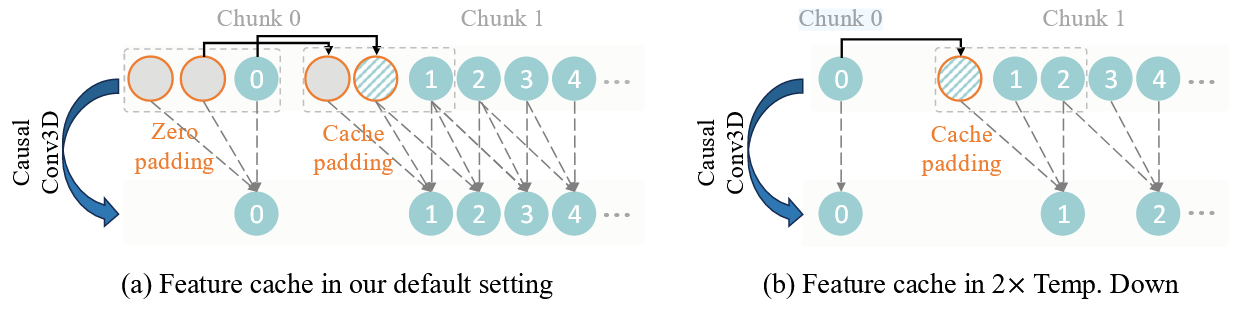
CasualConv3D,先在时间维度padding两个空白帧,这样卷积核为3的卷积就刚好能够屏蔽掉当前帧后续的帧以防止信息泄露。
这一部分的源码为:
1234567891011121314151617181920212223242526272829303132333435363738394041424344454647484950515253545556575859606162636465666768697071727374 def encode(self, x, scale):
self.clear_cache()
## cache
t = x.shape[2]
iter_ = 1 + (t - 1) // 4
## 对encode输入的x,按时间拆分为1、4、4、4....
for i in range(iter_):
self._enc_conv_idx = [0]
if i == 0:
out = self.encoder(
x[:, :, :1, :, :],
feat_cache=self._enc_feat_map,
feat_idx=self._enc_conv_idx)
else:
out_ = self.encoder(
x[:, :, 1 + 4 * (i - 1):1 + 4 * i, :, :],
feat_cache=self._enc_feat_map,
feat_idx=self._enc_conv_idx)
out = torch.cat([out, out_], 2)
mu, log_var = self.conv1(out).chunk(2, dim=1)
if isinstance(scale[0], torch.Tensor):
mu = (mu - scale[0].view(1, self.z_dim, 1, 1, 1)) * scale[1].view(
1, self.z_dim, 1, 1, 1)
else:
mu = (mu - scale[0]) * scale[1]
self.clear_cache()
return mu
def decode(self, z, scale):
self.clear_cache()
# z: [b,c,t,h,w]
if isinstance(scale[0], torch.Tensor):
z = z / scale[1].view(1, self.z_dim, 1, 1, 1) + scale[0].view(
1, self.z_dim, 1, 1, 1)
else:
z = z / scale[1] + scale[0]
iter_ = z.shape[2]
x = self.conv2(z)
for i in range(iter_):
self._conv_idx = [0]
if i == 0:
out = self.decoder(
x[:, :, i:i + 1, :, :],
feat_cache=self._feat_map,
feat_idx=self._conv_idx)
else:
out_ = self.decoder(
x[:, :, i:i + 1, :, :],
feat_cache=self._feat_map,
feat_idx=self._conv_idx)
out = torch.cat([out, out_], 2)
self.clear_cache()
return out
def reparameterize(self, mu, log_var):
std = torch.exp(0.5 * log_var)
eps = torch.randn_like(std)
return eps * std + mu
def sample(self, imgs, deterministic=False):
mu, log_var = self.encode(imgs)
if deterministic:
return mu
std = torch.exp(0.5 * log_var.clamp(-30.0, 20.0))
return mu + std * torch.randn_like(std)
def clear_cache(self):
self._conv_num = count_conv3d(self.decoder)
self._conv_idx = [0]
self._feat_map = [None] * self._conv_num
#cache encode
self._enc_conv_num = count_conv3d(self.encoder)
self._enc_conv_idx = [0]
self._enc_feat_map = [None] * self._enc_conv_num
Encoder3D和Decoder3D为
123456789101112131415161718192021222324252627282930313233343536373839404142434445464748495051525354555657585960616263646566676869707172737475767778798081828384858687888990919293949596979899100101102103104105106107108109110111112113114115116117118119120121122123124125126127128129130131132133134135136137138139140141142143144145146147148149150151152153154155156157158159160161162163164165166167168169170171172173174175176177178179180181182183184185186187188189190191192193194195196197198199200201202203204205206207208class Encoder3d(nn.Module):
def __init__(self,
dim=128,
z_dim=4,
dim_mult=[1, 2, 4, 4],
num_res_blocks=2,
attn_scales=[],
temperal_downsample=[True, True, False],
dropout=0.0):
super().__init__()
self.dim = dim
self.z_dim = z_dim
self.dim_mult = dim_mult
self.num_res_blocks = num_res_blocks
self.attn_scales = attn_scales
self.temperal_downsample = temperal_downsample
# dimensions
dims = [dim * u for u in [1] + dim_mult]
scale = 1.0
# init block
self.conv1 = CausalConv3d(3, dims[0], 3, padding=1)
# downsample blocks
downsamples = []
for i, (in_dim, out_dim) in enumerate(zip(dims[:-1], dims[1:])):
# residual (+attention) blocks
for _ in range(num_res_blocks):
downsamples.append(ResidualBlock(in_dim, out_dim, dropout))
if scale in attn_scales:
downsamples.append(AttentionBlock(out_dim))
in_dim = out_dim
# downsample block
if i != len(dim_mult) - 1:
mode = 'downsample3d' if temperal_downsample[
i] else 'downsample2d'
downsamples.append(Resample(out_dim, mode=mode))
scale /= 2.0
self.downsamples = nn.Sequential(*downsamples)
# middle blocks
self.middle = nn.Sequential(
ResidualBlock(out_dim, out_dim, dropout), AttentionBlock(out_dim),
ResidualBlock(out_dim, out_dim, dropout))
# output blocks
self.head = nn.Sequential(
RMS_norm(out_dim, images=False), nn.SiLU(),
CausalConv3d(out_dim, z_dim, 3, padding=1))
def forward(self, x, feat_cache=None, feat_idx=[0]):
if feat_cache is not None:
idx = feat_idx[0]
cache_x = x[:, :, -CACHE_T:, :, :].clone()
if cache_x.shape[2] < 2 and feat_cache[idx] is not None:
# cache last frame of last two chunk
cache_x = torch.cat([
feat_cache[idx][:, :, -1, :, :].unsqueeze(2).to(
cache_x.device), cache_x
],
dim=2)
x = self.conv1(x, feat_cache[idx])
feat_cache[idx] = cache_x
feat_idx[0] += 1
else:
x = self.conv1(x)
## downsamples
for layer in self.downsamples:
if feat_cache is not None:
x = layer(x, feat_cache, feat_idx)
else:
x = layer(x)
## middle
for layer in self.middle:
if isinstance(layer, ResidualBlock) and feat_cache is not None:
x = layer(x, feat_cache, feat_idx)
else:
x = layer(x)
## head
for layer in self.head:
if isinstance(layer, CausalConv3d) and feat_cache is not None:
idx = feat_idx[0]
cache_x = x[:, :, -CACHE_T:, :, :].clone()
if cache_x.shape[2] < 2 and feat_cache[idx] is not None:
# cache last frame of last two chunk
cache_x = torch.cat([
feat_cache[idx][:, :, -1, :, :].unsqueeze(2).to(
cache_x.device), cache_x
],
dim=2)
x = layer(x, feat_cache[idx])
feat_cache[idx] = cache_x
feat_idx[0] += 1
else:
x = layer(x)
return x
class Decoder3d(nn.Module):
def __init__(self,
dim=128,
z_dim=4,
dim_mult=[1, 2, 4, 4],
num_res_blocks=2,
attn_scales=[],
temperal_upsample=[False, True, True],
dropout=0.0):
super().__init__()
self.dim = dim
self.z_dim = z_dim
self.dim_mult = dim_mult
self.num_res_blocks = num_res_blocks
self.attn_scales = attn_scales
self.temperal_upsample = temperal_upsample
# dimensions
dims = [dim * u for u in [dim_mult[-1]] + dim_mult[::-1]]
scale = 1.0 / 2**(len(dim_mult) - 2)
# init block
self.conv1 = CausalConv3d(z_dim, dims[0], 3, padding=1)
# middle blocks
self.middle = nn.Sequential(
ResidualBlock(dims[0], dims[0], dropout), AttentionBlock(dims[0]),
ResidualBlock(dims[0], dims[0], dropout))
# upsample blocks
upsamples = []
for i, (in_dim, out_dim) in enumerate(zip(dims[:-1], dims[1:])):
# residual (+attention) blocks
if i == 1 or i == 2 or i == 3:
in_dim = in_dim // 2
for _ in range(num_res_blocks + 1):
upsamples.append(ResidualBlock(in_dim, out_dim, dropout))
if scale in attn_scales:
upsamples.append(AttentionBlock(out_dim))
in_dim = out_dim
# upsample block
if i != len(dim_mult) - 1:
mode = 'upsample3d' if temperal_upsample[i] else 'upsample2d'
upsamples.append(Resample(out_dim, mode=mode))
scale *= 2.0
self.upsamples = nn.Sequential(*upsamples)
# output blocks
self.head = nn.Sequential(
RMS_norm(out_dim, images=False), nn.SiLU(),
CausalConv3d(out_dim, 3, 3, padding=1))
def forward(self, x, feat_cache=None, feat_idx=[0]):
## conv1
if feat_cache is not None:
idx = feat_idx[0]
cache_x = x[:, :, -CACHE_T:, :, :].clone()
if cache_x.shape[2] < 2 and feat_cache[idx] is not None:
# cache last frame of last two chunk
cache_x = torch.cat([
feat_cache[idx][:, :, -1, :, :].unsqueeze(2).to(
cache_x.device), cache_x
],
dim=2)
x = self.conv1(x, feat_cache[idx])
feat_cache[idx] = cache_x
feat_idx[0] += 1
else:
x = self.conv1(x)
## middle
for layer in self.middle:
if isinstance(layer, ResidualBlock) and feat_cache is not None:
x = layer(x, feat_cache, feat_idx)
else:
x = layer(x)
## upsamples
for layer in self.upsamples:
if feat_cache is not None:
x = layer(x, feat_cache, feat_idx)
else:
x = layer(x)
## head
for layer in self.head:
if isinstance(layer, CausalConv3d) and feat_cache is not None:
idx = feat_idx[0]
cache_x = x[:, :, -CACHE_T:, :, :].clone()
if cache_x.shape[2] < 2 and feat_cache[idx] is not None:
# cache last frame of last two chunk
cache_x = torch.cat([
feat_cache[idx][:, :, -1, :, :].unsqueeze(2).to(
cache_x.device), cache_x
],
dim=2)
x = layer(x, feat_cache[idx])
feat_cache[idx] = cache_x
feat_idx[0] += 1
else:
x = layer(x)
return x
encoder和decoder传入的参数有一个feat_cache,这个就是储存的之前帧的需要重用的特征,这里的一帧指的是潜在空间(被压缩后的)的一帧,对应原始维度应该是4帧,在第一段代码中也可以看到有用4来切片的操作,
所以这个cache的核心目的是在时序建模中跨时间步重用特征,确保帧间的一致性。
其实就是一个卷积就获得了一个chunk的特征,然后用cache把这个chunk暂时保存起来,下一次的卷积就继续用之前保存的前两个chunk的特征来卷,之后释放掉cache。
三阶段训练 Link to 三阶段训练
- 首先,构建一个具有相同结构的二维图像 VAE,并在图像数据上进行训练。
- 然后,将训练好的二维图像 VAE 扩展为三维因果 Wan-VAE,以提供初始空间压缩先验,这大大提升了训练速度,相比从零开始训练视频 VAE 更高效。在这一阶段,Wan-VAE 在低分辨率(128×128)和小帧数(5 帧)的视频上训练,以加快收敛。训练损失包括 L1 重建损失、KL 损失和 LPIPS 感知损失。
- 最后,在不同分辨率和帧数的高质量视频上对模型进行微调,并结合 3D 判别器的 GAN 损失 。
DiT Link to DiT

Transformer block主要由三个组件构成:patch切分模块、transformer块和 patc 还原模块。
在每个块中,专注于有效建模时空上下文关系,并在时间步长上嵌入文本条件。
在 patch 切分模块中,使用卷积核大小为 (1, 2, 2) 的三维卷积,展平后,形状为,其中 B 表示批大小, 表示序列长度,D 表示潜在维度。
采用交叉注意力机制嵌入输入文本条件,确保模型在长上下文建模下依然能够遵循指令。
此外,我们使用一个由线性层和 SiLU 组成的 MLP 来处理输入文本嵌入,并分别预测六个调制参数。
该 MLP 在所有 transformer 块中共享,但每个块都会学习一组独特的偏置。通过大量实验,我们证明这种设计可以将参数数量减少约 25%,并在相同参数规模下显著提升性能。
I2V Generation Link to I2V Generation
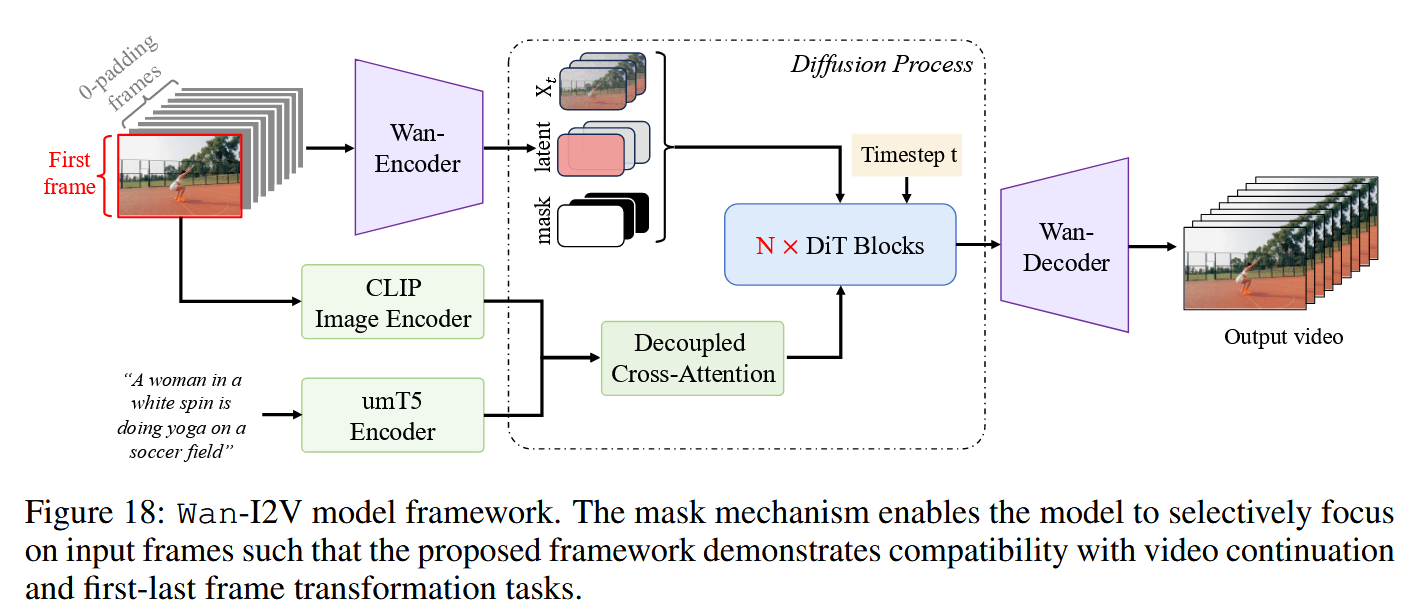
引入首帧,其余的帧用0填充
引入mask,和帧数一致长度,只有第一帧是1,其余待生成的为0
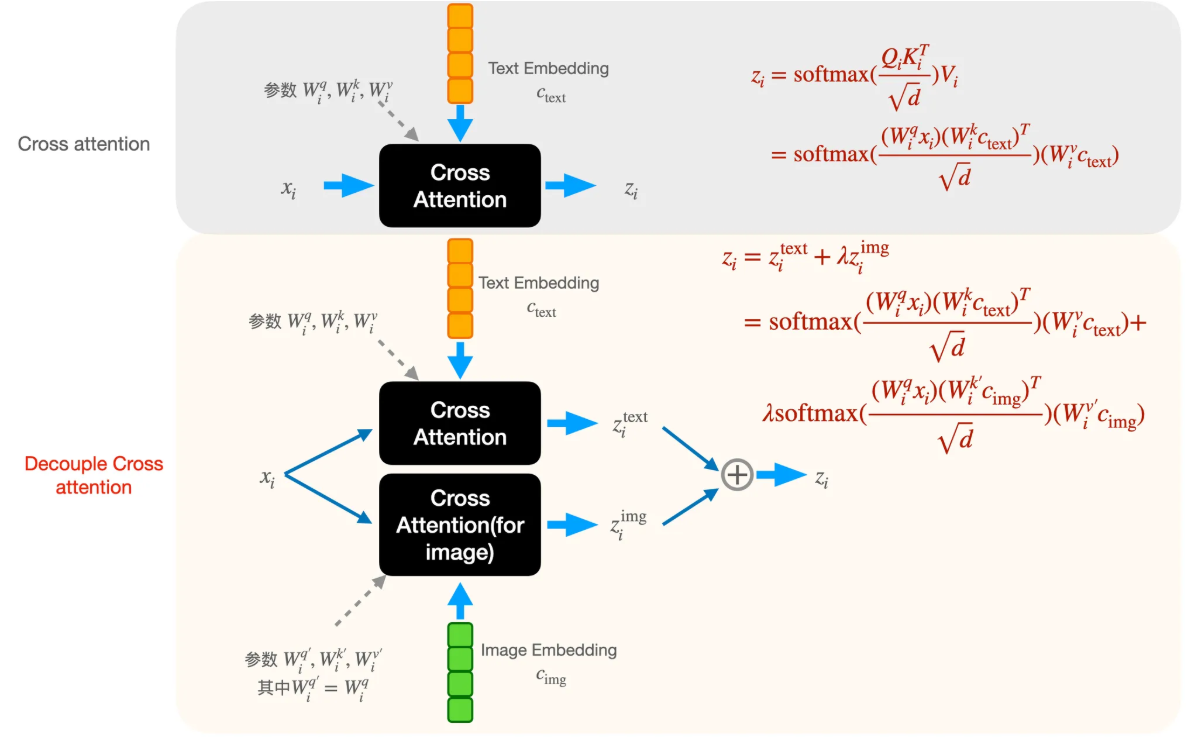
Decoupled CrossAttention和IP-Adapter一样,在源码中,经过CLIP的img token和经过umT5的text token拼接在一起,然后前image_context_length长度是img token,后面剩下的长度就是text token,两边的token分别经过不同的CrossAttention去融合到DiT中。
1234567891011121314151617181920212223242526272829303132333435363738394041424344# I2V使用的CrossAttention
class WanI2VCrossAttention(WanSelfAttention):
def __init__(self,
dim,
num_heads,
window_size=(-1, -1),
qk_norm=True,
eps=1e-6):
super().__init__(dim, num_heads, window_size, qk_norm, eps)
self.k_img = nn.Linear(dim, dim)
self.v_img = nn.Linear(dim, dim)
# self.alpha = nn.Parameter(torch.zeros((1, )))
self.norm_k_img = WanRMSNorm(dim, eps=eps) if qk_norm else nn.Identity()
def forward(self, x, context, context_lens):
r"""
Args:
x(Tensor): Shape [B, L1, C]
context(Tensor): Shape [B, L2, C]
context_lens(Tensor): Shape [B]
"""
image_context_length = context.shape[1] - T5_CONTEXT_TOKEN_NUMBER
context_img = context[:, :image_context_length]
context = context[:, image_context_length:]
b, n, d = x.size(0), self.num_heads, self.head_dim
# compute query, key, value
q = self.norm_q(self.q(x)).view(b, -1, n, d)
k = self.norm_k(self.k(context)).view(b, -1, n, d)
v = self.v(context).view(b, -1, n, d)
k_img = self.norm_k_img(self.k_img(context_img)).view(b, -1, n, d)
v_img = self.v_img(context_img).view(b, -1, n, d)
img_x = flash_attention(q, k_img, v_img, k_lens=None)
# compute attention
x = flash_attention(q, k, v, k_lens=context_lens)
# output
x = x.flatten(2)
img_x = img_x.flatten(2)
x = x + img_x
x = self.o(x)
return x
decoupled cross-attention相比直接生成一般用的cross attention多了两个训练参数,起始阶段用text分支的进行初始化。(下标i代表第层cross-attention)。
可以通过调整image embedding的权重λ来决定image condition的影响程度。
==DiT为什么比Unet好==
1)引入Transformer架构,Transformer架构更擅长处理时序相关的问题,解决了Unet模型架构对于时序生成的最大难点。
2)能并行接受更多的输入信息,可以让生成模型的输入更加灵活。
**之前:**在DiT前,视频生成算法尝试过大量的架构,核心思路就是一个,引入时间维度T的信息。一种直观的解决方案是,直接在UNet上进行加一维,即变成3D-Unet。
**加补丁:**3DUnet确实是有多一维的特征了,但是仍然有个问题没有解决,至少没有被很好的解决时序上的一致性问题。因此还需要加后补丁,比如在cross-attention上也加一路输入,包括和IP-Adapter一样,加一路时序的decoupled attention,或者cross attention 中的v用上一帧的v替换当前帧。
**再加补丁:**但是又有新问题出现,仅仅考虑相邻两帧又不够了,又得考虑多帧的逻辑关联,因此这边又加进一步优化,像是多帧的一致性模块之类的。
而Transformer天然支持时序输入,而且可以并行处理多路输入,也就是说,在Unet中解决不了的问题(时序+多帧输入),在Transformer(DiT)这边是比较容易的问题
==为什么Wan DiT里面用了交叉注意力==
T2V的cross attention应该是为了更好的融入文本信息
使用decoupled cross-attention,可以通过调整image embedding的权重λ来决定image condition的影响程度,将图像特征融入到了生成过程
==T2V 变成I2V==